DAY 10 Lessons: Monetize your blog using Google Adwords/Adsense


It’s Day 10, our last lesson for 2011!  


Our lesson for today is about Google’s Adwords & Adsense programs and how you, as a blogger, can earn from these. But first, let’s differentiate the two:

Google Adwordsis Google’s program for Advertisers. Who are the advertisers? – they are the companies/business owners who want to advertise their products/services online.  Advertisers pay Google to display their ads online.

Google Adsense – on the other hand, is Google’s program for Publishers.  Who are the Publishers? – they are the owners of the blogs and websites where the ads are going to be displayed.  Google pays Publishers to display the ads on their blogs or websites.

Basically, Google acts as the “middle man” between the Advertisers and Publishers.  Google is responsible for screening the Publishers (and their sites), and they also monitor if the clicks generated from the ads are valid.


As a blogger, you can earn from Google's Adsense Program if you apply  for an Adsense account and get accepted or approved.  Google is very strict in reviewing Adsense account applications so make sure to keep in mind the following information.

To get an Adsense Account approval, you must observe the proper application procedures and your blog must comply with the site content guidelines:

1. The personal information in your application form should be accurate and should match the personal information on your blog or website.

2. Your site should contain substantial and original content. and

3. Your site should not include prohibited content (see list below):
  • Adult content (i.e.pornography)
  • Content that advocates racism or biased against an individual, group or organization.
  • Copyrighted materials (ex. mp3 songs, literary works, tv shows, etc.)
  • Content about illegal drugs, alcohol, tobacco-related products, and gambling.
  • Content that promotes computer hacking and cracking.
  • Content about "Get-Paid-To" sites (ex. pay to click, pay to read emails, pay to surf and other similar sites.)
  • Sites with Google Brand features. 
  • Violent and weapon-related content, and
  • Other illegal content.
Click HERE to know more about prohibited content.
Click HERE to see complete list of Adsense criterias.

Google Adsense is still the best free program for bloggers who want to generate income from their blogs, so be very mindful of their policies and criteria if you want to be a part of their program.

That's it for Day 10.

I’ll be with you again next year! Happy New Year Everyone!

God Bless!

Piaps ^_^


Next lesson (Day 11) >> How to Effectively Write for Online Readers.

---------------------------

DAILY PRAYER :

“Dear Lord, Guide me in my daily tasks.  May I learn something new every day and make use of what I’ve learned to improve myself. Keep me inspired and help me to stay focus so I may finish what I have planned to accomplish.

AMEN
------------------------------

DAY 9 Lessons: Useful Blogging Tools & Resources

Day 9 and today I'm going to present to you useful tools and resources for blogging. 

Actually, Blogger.com has lots of useful tools and gadgets already like the Google analytics, mobile and email posting, blog statistics and sharing gadgets, RSS and email subscription, and others.  So consider my recommended list of resources as additional “must-have” tools for bloggers, BTW, these are all free to download &/or use...


Six (6) "Must-Have" Blogging Tools/Resources:


1. A Screen Shot Software - To capture images on your screen, images that you may want to share in your blog.  Best recommended free software to accomplish this task is ScreenHunter 5 Free Version:

ScreenHunter 5 is a free software that can capture images on your screen and saves them as bitmap, jpeg or gif files (depending on your settings).  It can capture the whole image on your screen or just parts of it. It's easy to use and their free version is more than enough for your blogging needs.


2. An Image Editing Tool - To add descriptions, instructions or notes in the photos that you will use in your post. Microsoft's Paint is enough to do this task OR you can also use Paint.NET,  a free replacement for the Microsoft Paint.  Download it here >> http://www.getpaint.net/


3. Photos/Images for your blogs - To make your post more interesting. There are lots of photo-sharing websites online, both free and for a fee.  For free photos, I recommend FreeDigitalPhotos.net, they have lots and lots of quality photos which you can view by categories (ex. people, business, health, nature, etc.  Photos are free to use provided you publish a credit to the person who created the image. 


4.  A Blog Traffic Tracker - The best free tool I can recommend to track your blog is Feedjit.com.

Feedjit.com can give you real-time traffic feeds.  Know where your visitors are coming from, what keywords did they use in search engines to find your blog, and what link did they clicked when they left your blog. I'm using Feedjit's free version in my other blog, see how it works below:


This is how it looks like when installed in your blog's sidebar (just a sample, you can customize the background color, text color, width, and others settings to complement your blog design):


5. A Spell Checker - Spelling mistakes (and grammar) in your post may led readers to believe that you're careless or s-t-u-p-i-d, either way wrong spelling/s in your articles can affect your credibility as a blogger. 

To check word spellings, I recommend this free online spell checker website (no need to download anything, you can use it online):


6. A Thesaurus - This is helpful to avoid repetition of words in your post.  Best and most trusted online site to help you is Thesaurus.com.

Thesaurus.com also offers an online dictionary, translator, quotes and word references.

That's it for Day 9, I’ll be with you again tomorrow!


God Bless!

Piaps ^_^

Assignment >> Visit the sites I’ve mentioned and bookmark or download them for future use.

Next lesson >> Monetize your blog using Google Adwords/Adsense.

---------------------------
DAILY PRAYER :

“Dear Lord, Guide me in my daily tasks.  May I learn something new every day and make use of what I’ve learned to improve myself. Keep me inspired and help me to stay focus so I may finish what I have planned to accomplish.

AMEN
------------------------------

DAY 8 Lessons: Inserting Pictures & Videos in Your Post

Hello again it’s Day 8 for our free blogging lessons! Only 2 more lessons left for this year!

Today’s lesson is about inserting pictures/images and videos in your post. Let me share some reasons why you need them in your posts.

 
We all know that text content is the real essence of a blog, readers go to your blog to read articles. But just like a book, your post looks more beautiful (and not boring) when there are pictures in it. 

Also, when your blog post is a little short of text content, adding a picture (or video) can help lengthen it.

Though there are times when bloggers really needed to add images and/or videos in their posts - like when they are explaining or describing something complicated, adding a picture or a video can help them a lot. (Like what I'm doing ^_^)

And surprisingly pictures and videos also help in bringing traffic to your blogs. How? Thru image search engines and YouTube.  So it's important to name your picture and video files properly.  

Example:

If you're picture's file name is "pict_0023.jpgchange it to "manilazoo.jpg" and if your video's file name is "vid_3455.mpeg" change it to "dancingcat.mpeg".  


How to insert a picture or image in your post:
Click on the "insert image" icon, a pop-up box will appear prompting you to choose where your picture file will be coming from (mostly we just upload from our personal computers):


If you selected "Upload", a file upload box will appear and from there you can browse your computer which file to upload, after clicking on your choice, click "Open". 


After clicking the "Open" button, your image will be automatically uploaded and then all you have to do is click on the "Add Selected" button to insert the
image in your post.

How to insert a video in your post:

Same as inserting an image except here you only have 3 options for your video file source: Upload from your computer, from YouTube, and from your YouTube account videos.


NOTE: 

And if your editing icons are also not visible like mine, the "insert image" and "insert a video" command is just beside the "link" (right side):

For other missing icons, just place your cursor on a particular area and a text will appear to tell you what command is in that area.


Okay, that's it for Day 8!

I’ll be with you again tomorrow!


God Bless!

Piaps ^_^


Next lesson >> Useful Blogging Tools and Resources

---------------------------
DAILY PRAYER :

“Dear Lord, Guide me in my daily tasks.  May I learn something new every day and make use of what I’ve learned to improve myself. Keep me inspired and help me to stay focus so I may finish what I have planned to accomplish.

AMEN
------------------------------

DAY 7 Lessons: Difference Between Posts & Pages

Today, we will talk about the difference between "Posts" and "Pages".

A blog "post", as you already know, refers to the articles or stories that you regularly add to your blog. By default, when a reader visits your blog address (ex. piapsguide.blogspot.com), the first content he/she will encounter is your most recent or latest post.

On the other hand, a blog "page", works like an ordinary website page, its content remains the same and can be access easily thru a link depending on the selected page setting. The content in your "pages" are not counted as "posts".

Pages, as I have mentioned in our Day 5 lesson, is a type of gadget that you can add in your blog. Before you can only add up to 10 pages but now you can add up to 20 pages.

There are two ways to add a Page gadget. 

1. The LONG Cut: Click on "Design", then "Layout", then "Add a Gadget".  Click on the plus sign on the Pages to add this gadget.


2. The SHORT Cut: Click on
"Design", then "Pages" link found at the left-side part.


You can set your pages to show in your blog's sidebar as "Side Links" or you can set it to show as "Top Tabs". For this blog, I chose the "Top Tabs", readers see it like this:


To add an additional page, click on the "New Page" button. You have the option to add a blank page (one that you can customize later) or you can add a web address or URL to send your readers to another webpage.


If you choose "Blank Page", you will be redirected to the page editing area where you can customize the content of that page.


If you choose to add a "Web Address", a pop-up box will appear and you have to type the page title and the web address (URL) you want to link to, then click on "save".


 Readers will view the pages that you added like this:


That's it for DAY 7, I'll be with you again tomorrow.

God Bless!


---------------------
Your Assignment:

Add at least 2 pages in your blog. (example: About Me, Contact Me, My Videos, Events, etc.)

Next Lesson>> Inserting Photos & Videos in Your Post

===============
DAILY PRAYER :  

“Dear Lord, Guide me in my daily tasks.  May I learn something new every day and make use of what I’ve learned to improve myself. Keep me inspired and help me to stay focus so I may finish what I have planned to accomplish.          

Amen

---------------------------

DAY 6 Lessons: About Labels and Your Posts

In our last lesson, your assignment is to add a gadget called "Label".   A “Label” gadget is very useful in classifying your blog posts according to topics. This gadget will help you keep track of your posts and will likewise help your readers easily find specific topics in your blog.

How to Use Labels:

I assumed that you already add your "Label" gadget, so the next thing you need to do is to click on “Design” on upper right- most corner of your blog, then "Layout".  Click on your "Labels" gadget and change it to CATEGORIES or TOPICS (in this blog, I chose "categories") then click on "SAVE".


After saving your settings and when you view your blog, you will notice that nothing changed at all, the gadget that you added (and edited) are not visible.  It's because labels can only be seen once you have a "labeled" blog post.


How To label a blog post:

When you create a new post (by clicking "New Post" link on upper-right corner), you will notice a "Post Settings" on the right side of your screen. Click on "Labels" and this will appear: 


For example, I made a post to greet blog readers a Merry Christmas, now if I labeled it "Holiday Greetings" and clicked on done to save it, when I published my post, CATEGORIES will now appear on my side bar including the label I typed-in for that particular post.


Readers will see it like this:


You can add several labels for each post. 

That's all for DAY 6! I'll be with you again tomorrow. 

God Bless!

Your Assignment:

List five possible future topics for your blog and take note of how are you going to label each post.

Next Lesson>> Difference between Posts and Pages


---------------------------
DAILY PRAYER :  

“Dear Lord, Guide me in my daily tasks.  May I learn something new every day and make use of what I’ve learned to improve myself. Keep me inspired and help me to stay focus so I may finish what I have planned to accomplish.          

Amen

---------------------------


MERRY CHRISTMAS!


"May your homes be filled with the joy 
of family and friends this holiday season."


DAY 5 Lessons: About Your Sidebar and Widgets


Hello it's Day 5 and our lesson for today is about widgets and your sidebar. ^_^

ABOUT SIDEBARS:

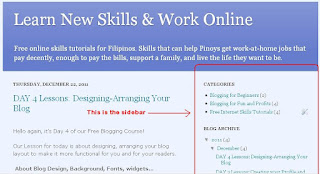
For beginners, the picture below shows what a sidebar is. A sidebar is usually located on the right side part of a blog, though you can choose to make your side bar appear either sides or on both sides.  
A sidebar is usually on the right because we normally read from left to right.  So when you have a right sidebar and a reader visits your blog, he/she will first pay attention on what's on the left side of your blog - your content (and that is good).


To customize the location and layout of your blog, click on "Design" (found at the upper right corner of your blog), then click on "Customize" (orange button), then "Layout".  For this blog I chose the layout with one sidebar plus another two just below it:  No particular reason for choosing it, just my own preference.

ABOUT WIDGETS (Gadgets):

Widgets are small applications found on the sidebars.  They help bloggers customize the look and content of their blog sidebar easily.  Widgets are also known as "gadgets" in Blogger.com

To install a widget or gadget in your sidebar, click on "Design" and then click on "Layout".  On the sidebar area, click on "Add A Gadget".


A pop-up box will appear with a selection of gadgets for you to choose from.  Click on the plus sign on the gadget that you want to add in your sidebar.


After you have added all the gadgets you need in your sidebar, you can arrange and re-arrange their positions by just dragging it with your mouse.

LIST OF "MUST HAVE" GADGETS IN YOUR SIDEBAR:
  • Search Box - This will come in handy when your blog is already "thick" with posts.  A reader can search for a topic in your blog, with options to include search in your posts' links &/or the web. It is powered by Google Blog Search.
  • Follow By Email - This will make it easy for your readers to follow your blog posts by email. It's like a subscription gadget.
  • Labels - To categorize your posts.
  • Archives  - For readers to access your old posts.
  • Pages -  For you to display and categorize your pages.  Pages works like webpages (I will discuss more of this will in our future lessons).
  • Social Bookmarking Gadgets (ex. Share It, Sociable and Add This) - So that readers can easily share your blog in their Facebook, Twitter accounts, email, and other social bookmarking sites.
  • Others - Blog Statistics, followers, Recent Posts, Video Bar, etc.

Your Assignment: 

Add at least 3 gadgets in your sidebar today:
  1. A social bookmarking gadget (Share It and/or Sociable)
  2. Labels (We will use this next lesson)
  3. Blog Statistics

Okay that's it for Day 5!

Be with you again tomorrow!  God Bless!

Piaps  ^_^


Next lesson >> How to Use Labels to Categorize your Posts.
---------------------------
PRAYER for TODAY :

“Lord guide me in my daily tasks.  Give me patience to fully understand the lessons and give me determination to keep doing what needs to be done in order to reach my blogging goals.

AMEN
------------------------------


DAY 4 Lessons: Designing-Arranging Your Blog


Hello again, it’s Day 4 of our Free Blogging Course!

Our Lesson for today is about designing, arranging your blog layout to make it more functional for you and for your readers.
  
 About Blog Design, Background, Fonts, widgets...


Your blog design, background color, fonts, etc, depends on the purpose of your blog and preference of the blogger.  However, there is a general rule to follow (or most common among blogs):

For Business Blogs:

  • A clean professional look, white background, black text, a "Verdana" or "Georgia" font.
  • An "opt-in" or sign-up form to newsletters/email updates.
  • Social media sharing icons like the ones below:
 

For Personal Blogs

  • For personal blogs it's pretty much obvious - you can go for any look, background, fonts, etc. as long as the content/text is still readable and readers can still navigate your blog with ease.
Blog Layout:


Again, blog layouts also depend on the blogger's preference but the most common is a two-column with 1 or 2 sidebars on the right.


The good thing about Blogger is you can change your layout easily as you please.
We will talk about what to put in your sidebars in our upcoming lessons.

Your Assignment:  

Determine the purpose of your blog. You have to decide what's the purpose of your blog to avoid unnecessary revisions in the future.


Is it a personal blog

An online diary to share your experiences, milestones, opinions, recommendations.

Is it a business blog?  

To market a product or service or both.
To communicate with your clients.
To share your knowledge and expertise.

Okay, be with you again tomorrow!

God Bless!


Next lesson >> About Sidebars and Blogger Widgets

---------------------------
PRAYER for TODAY :

“Lord guide me in my daily tasks.  Help me understand the lessons. Give me patience and determination to accomplish the things I needed to do in order to reach my blogging goals.

AMEN
------------------------------


DAY 3 Lessons: Creating your Profile and your First Post.


Day 3 Everyone!


Have you done your blogger profile yet (your assignment)?  I truly hope you did!

First, let me tell you why it is important to create, complete (with photo, interests, favorites, etc.) and share your profile when blogging:
  

1. It gives you credibility.  

2. Readers like blogs more if they know something about the blogger, thus a shared complete profile increases your followers.

3.Increases your traffic.  Did you notice that some of the font colors of the text in your profile changed to blue?   


These are called “activated links” and they work like this... For example, in my occupation I typed-in Financial Advisor and it became an activated link, every time I click on that link, a search page like the one below will appear showing a list of bloggers that have Financial Advisors as their occupation (me included).


So remember to complete your profile and share them!


NOW LET'S GO TO YOUR FIRST BLOG POST... 

What to write in your first post?

Write something about you, just like what you did in your profile BUT give more details. Tell them what you do and what you have done professionally.  Share little things about you, your kids, your pet dog, friends.  Include a picture of you showing you with your friends or you in a place you like to hang-out. (Readers will surely appreciate it. :))

Share the purpose of your blog and what your readers will expect from your blog in the future.

Encourage your readers to comment on your post/s.  Get them involved as this will help you in making your blog grow and become more popular. Readers can also give you ideas which you might need in making your blog a success.

And lastly, provide a contact information.  Let your readers know that you are available and accessible. ;)


YOUR ASSIGNMENT:  Complete and share your profile and make your first blog post.


That's it for Day 3!
I'll be with you again tomorrow. God Bless!


Next lesson >> Designing-Arranging your Blog 

---------------------------
PRAYER for TODAY :

“Lord guide me in my daily tasks.  Teach me to connect with other people.  Help me make an impact in the lives of others thru my blog.  Give me clarity and focus so that my blog may serve its purpose.

AMEN
------------------------------